The MSI MEG X570 Ace Motherboard Review: Ace in the Hole at $369
by Gavin Bonshor on July 18, 2019 11:00 AM EST- Posted in
- Motherboards
- AMD
- MSI
- AM4
- Zen 2
- Ryzen 3000
- X570
- MEG
- X570 Ace
- 3700X
- Ryzen 3700X
BIOS
MSI is using its Click BIOS 5 firmware which we have seen numerous times before including in our MSI MEG Z390 Ace motherboard review. The design is consistent throughout, with a red and black theme, with white and grey text making up the bulk of the GUI. Users looking to enter the BIOS can do so by pressing the F2 or Del key during POST, with MSI offering two modes to select from: the basic mode or the advanced mode. The advanced mode can be accessed by pressing the F7 key, and it opens up a wide variety of customizable options.

Starting with the basic mode, if offers basic settings including the option to enable or disable CSM/UEFI, enable or disable AHCI and RAID, as well as being able to turn the RGB functionality on or off. However, there are no Mystic Light RGB options in the firmware, so users will need to rely on the MSI Dragon Center software in the OS for this. In the top left-hand corner is the Game Boost button which gives users access to seven different pre-defined overclocking profiles. Users can select whether this is controlled by the hard-wired dial on the board, or via the firmware in software mode. Also to the right of this is an A-XMP button which allows users to enable XMP 2.0 profiles on installed DDR4 memory kits. Towards the top right-hand side is a basic list of information including the installed processor, the firmware version used, basic voltage readings, as well as CPU core clock speed.

Upon pressing the F7 key, users can access the advanced section of the firmware which opens up a number of options which includes enabling or disabling the board's controllers including networking and audio. This is also where users will find PCIe options including setting the full-length slots to PCIe 4.0, PCIe 3.0, although there are usually best left on auto. Other settings such as power management including system power fault protection, ErP, as well as Secure Erase+ for users looking to securely wipe a storage drive before use.
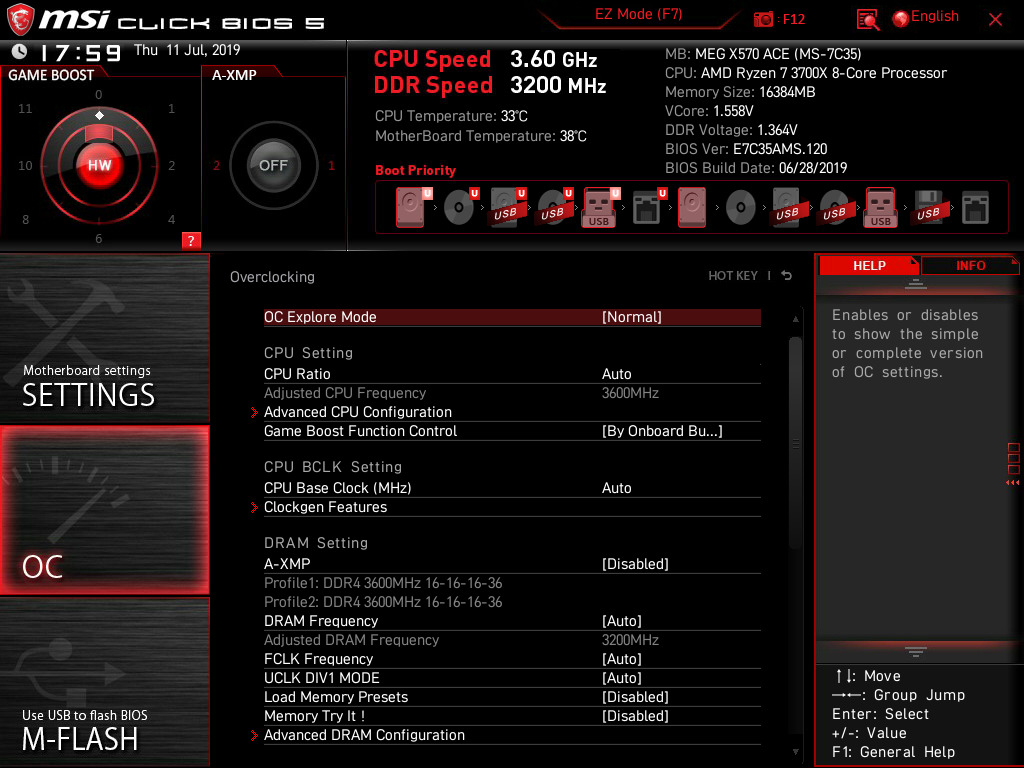
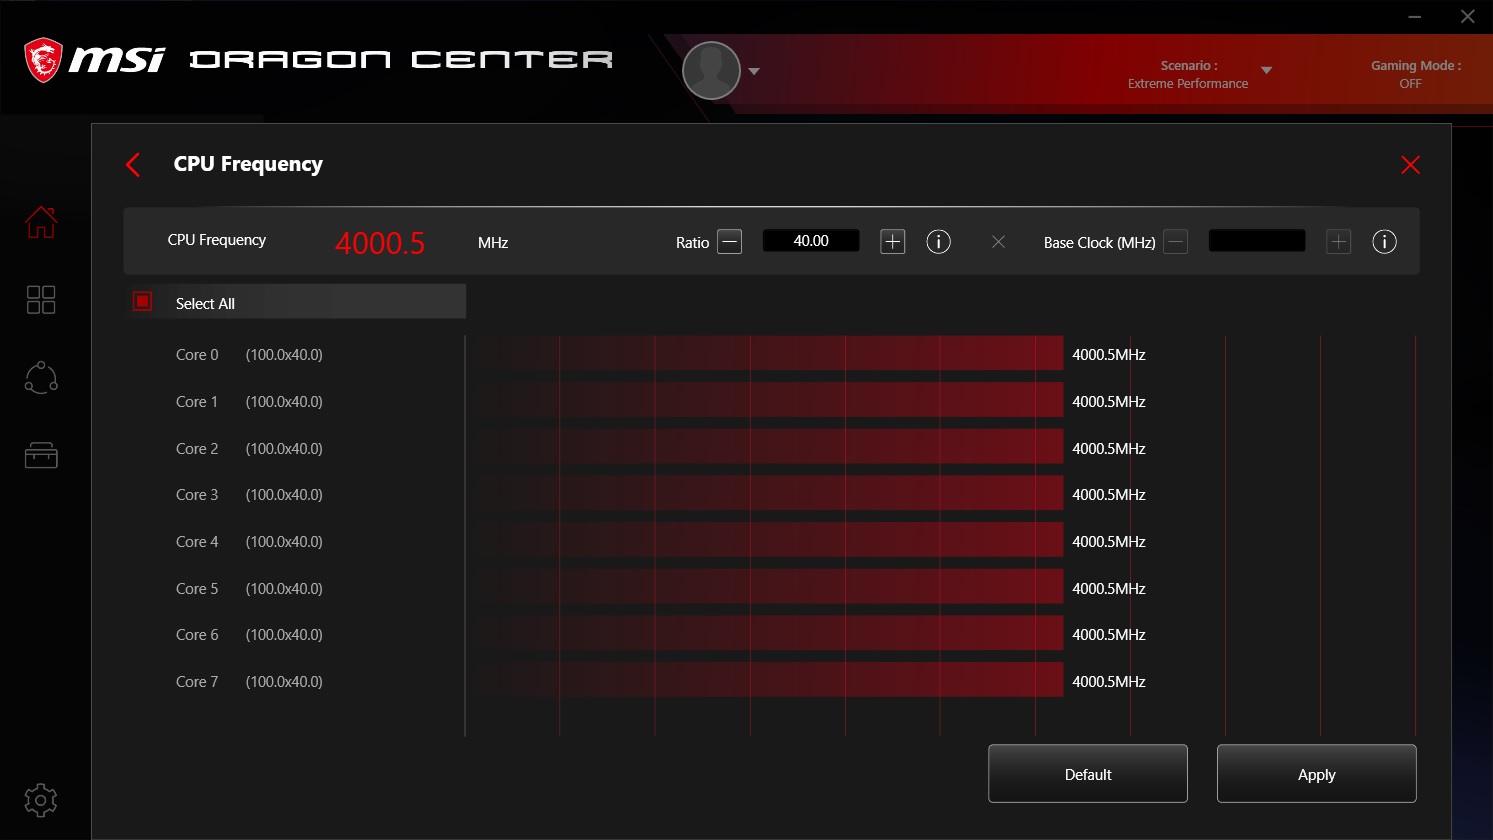
All of the overclocking related settings can be handily found within the OC section and includes options for changing things like CPU core frequency, numerous voltage settings, as well as adjust FCLK frequency and AMD's Precision Boost Overdrive power settings. Users can also alter memory settings with options including DRAM frequency, latency timing control, memory voltage, and six different memory presets for high-performing memory kits capable of achieving tight timings such as DDR4-4400 CL14. MSI also offers four different Precision Boost Overdrive profiles which we have tested over in our overclocking section. Although most users will never be capable of running these settings maxed out, below is a list of limitations using the current firmware for numerous settings including CPU VCore voltage, DRAM frequency, and FCLK frequency:
- Maximum CPU VCore = 2.00 V
- Maximum DRAM Frequency = DDR4-6000
- Maximum FCLK Frequency = 3000 MHz
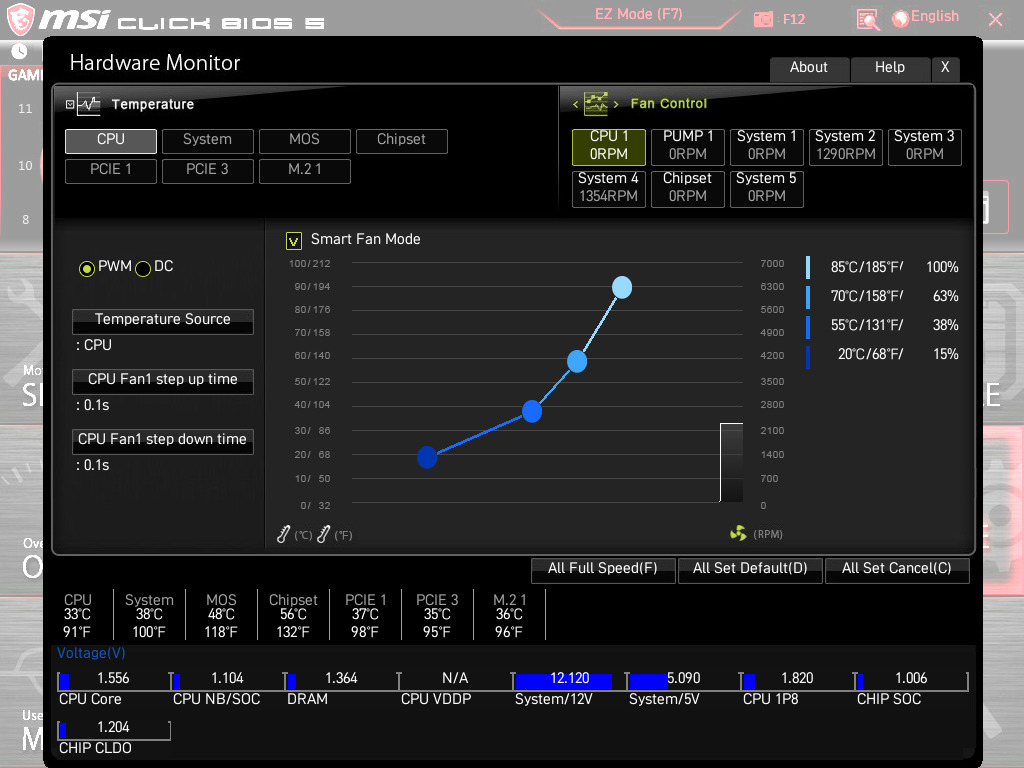
A usual feature of MSI's Click BIOS 5 is the hardware monitor which allows users to keep track of variables including temperature, and fan speed. Users can also customize fan curve profiles for more efficient cooling and with the heat generated by the new AMD Ryzen 3000 processors, it's something users should pay close attention to. Options to select between PWM and DC mode is welcomed, as well as being able to mass select all the fans to full-speed or back to default settings. It would have been nice for MSI to include this to fan profiles, as currently, users will have to create a fan profile for each individual fan installed.
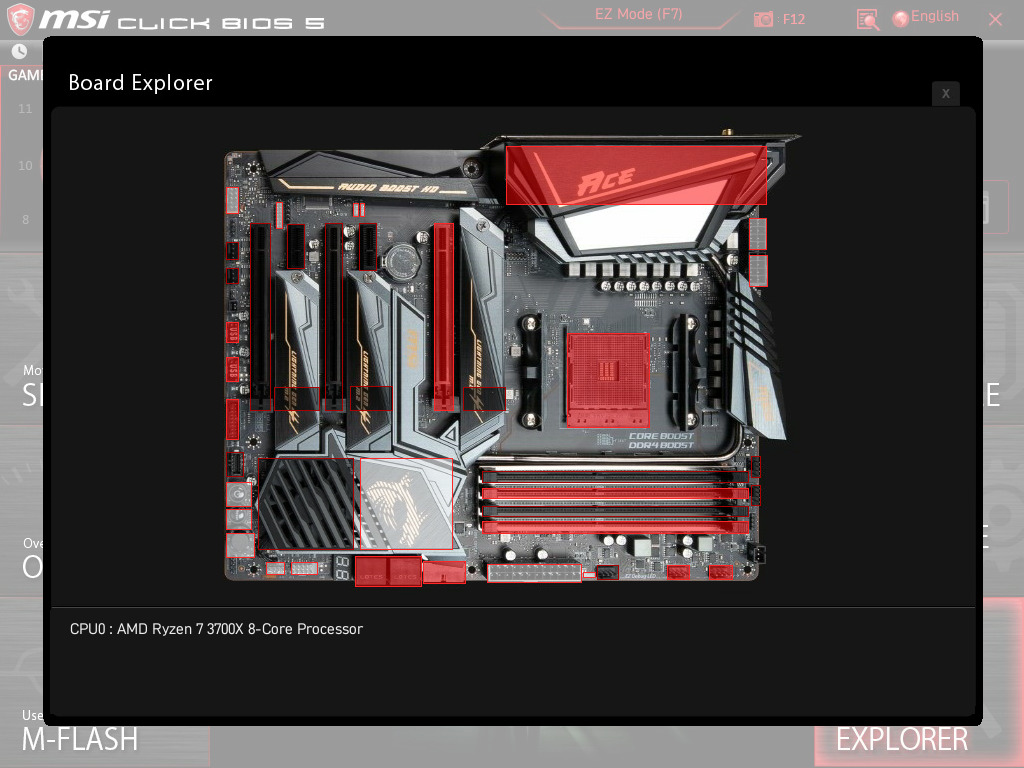
Another common feature included with MSI's Click BIOS 5 firmware is an interactive board explorer. Users can explore a visual representation of the MSI MEG X570 Ace from a birds-eye view. When a component or device is installed/plugged into the board, each area is highlighted in red and hovering over each section provides basic information about what's installed. This includes the processor, memory, storage, front panel headers including 4-pin fan headers, the rear panel, and the PCIe 4.0 slots. It's not exactly groundbreaking, but it could prove useful for diagnosing dead connections, devices, and headers.


Whether it's down to the infancy of the X570 chipset and some issues still need working out, the Click BIOS 5 firmware was very temperamental at times and generally quite laggy. I raised this issue with MSI and they had informed us that we weren't the first to experience lag within the BIOS. Even with the latest firmware, the user experience was a little lacklustre and it's something that will hopefully get better with time. As it stands, the firmware has plenty of customizable options designed to push the Ryzen 3000 processors safely beyond its limits. MSI usually provide one of the better-looking firmware designs on the market, but in this case, it's let down by shoddy mouse and keyboard response which when overclocking, and changing power settings, could result in accidental damage to hardware if users aren't careful. If in doubt, overclock using the AMD Ryzen Master utility as it's one of the better-implemented pieces of overclocking software around.
Software
Normally with a massive variety of individual software and utilities, MSI has finally condensed things right down to just a handful. Usually, we expect a different application for every aspect of the feature set including RGB, audio, overclocking, even for things such as network traffic shaping. Moving forward and progressing into 2019 and MSI has wrapped up all of its key software into an intuitive, and well laid out application called the MSI Dragon Center. Also included with MSI's software bundle is a custom MSI Gaming themed CPU-Z monitoring utility.
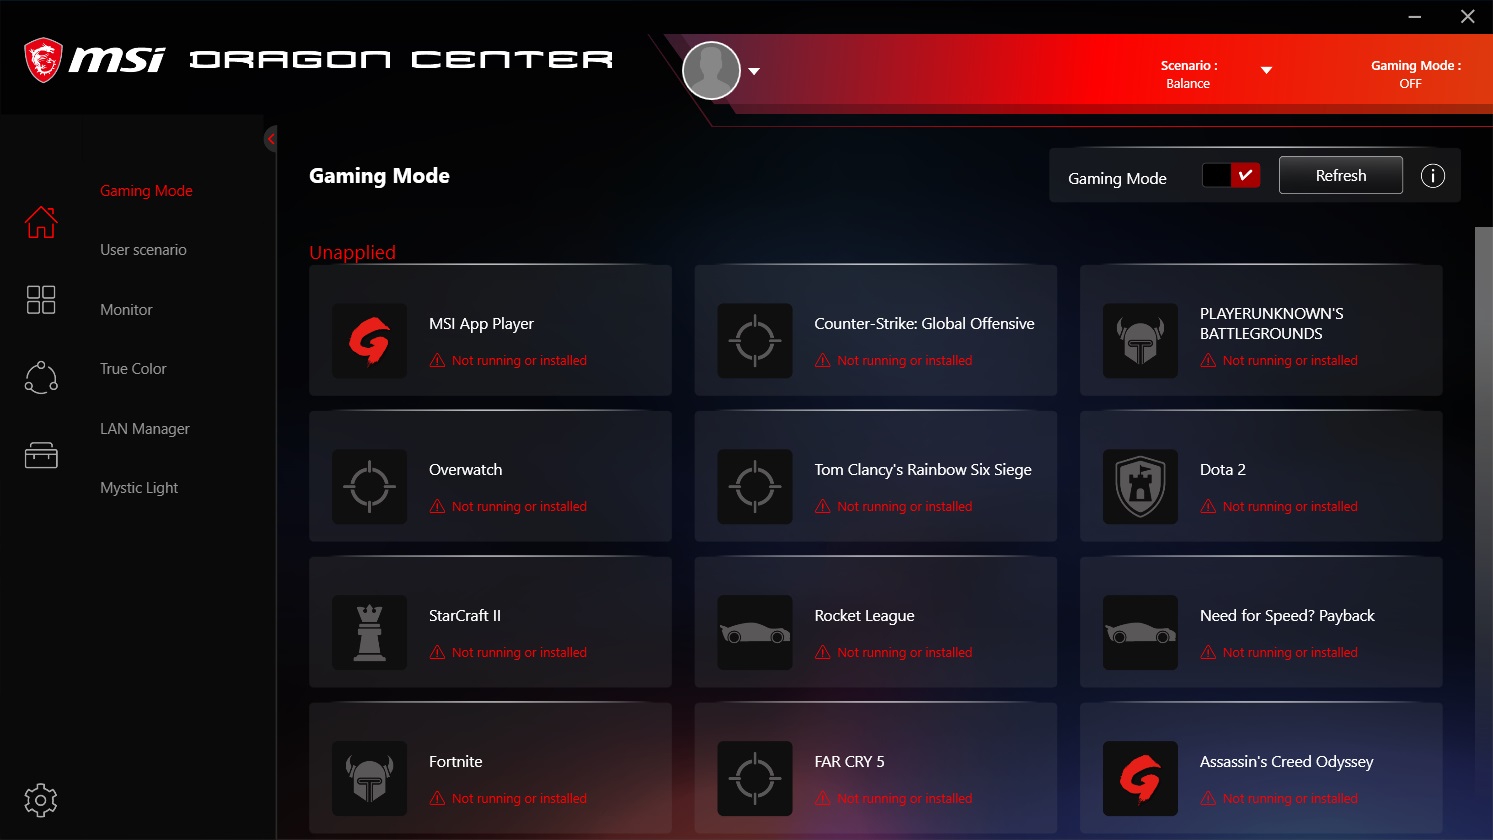
The MSI Dragon Center amalgamates all of its core software features into one easy to use, and aesthetically pleasing red and black themed application. Within the Dragon Center is the Gaming mode which is designed to optimize settings based on the game being played. This includes presets for games such as Dota 2, Rocket League and even Fortnite. On the left-hand side is a menu which features the user scenario option which allows users to customize performance attributes, and even do overclocking without needing to enter the firmware. Also present is MSI True Color which offers different visual profiles for activities such as gaming, movies, and for when your eyes are tired, EyeRest. Next is MSI's traffic shaping LAN manager for the Realtek RTL8125AG 2.5 G and Intel I211-AT NICs, and at the bottom is the Mystic Light RGB utility which allows users to customize the boards RGB LEDs.
Nestled into the User Scenario section are options to overclock the installed processor with basic options for CPU core frequency, associated voltage options including CPU VCore, SoC voltage, as well as basic memory overclocking options such as DRAM frequency, making alterations to the primary timings, and DRAM voltage. Users looking for a more comprehensive overclocking utility, the AMD Ryzen Master software works very well and is a lot more intuitive and comprehensive than MSI's offering at present.

Similar to what's included in the firmware, the MSI Dragon Center also includes a basic Smart Fan utility. This gives users the ability to set custom fan profiles based on four different temperature points. For users looking to take more control, the Manual Fan option allows users to individually set each of the boards seven 4-pin headers to whatever fan speed they wish. The Fan Tune setting gives the MSI MEG X570 Ace the nod to judge the cooling conditions and automatically set fan profiles based on what it thinks is optimal.
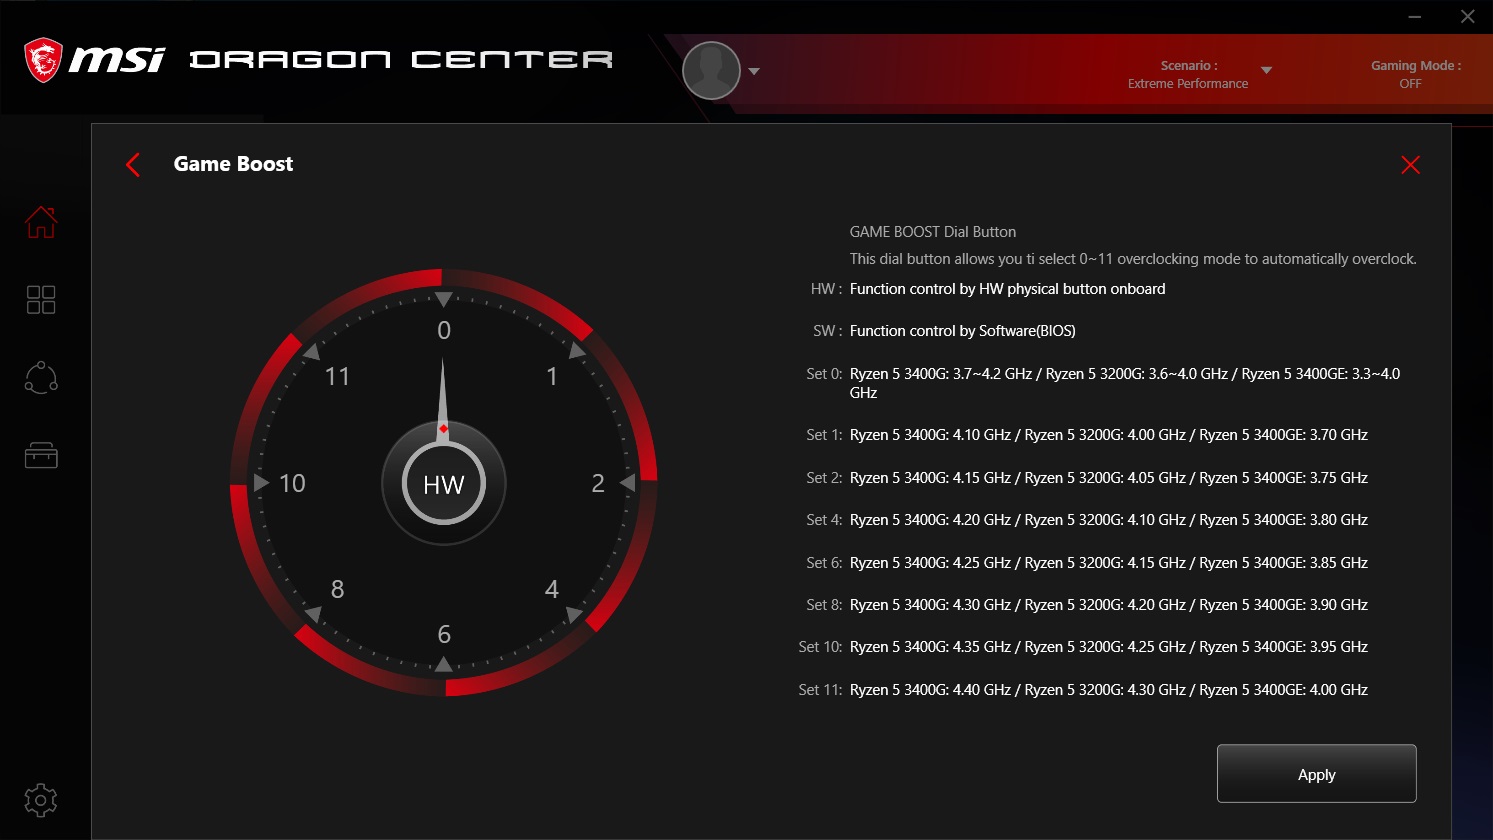
Replicating the options in the BIOS and offering what Game Boost does dial which is present on the bottom right-hand corner of the PCB, is a section in the Dragon Center utility aptly called Game Boost. Unlike in the firmware, the software actually highlights the profiles settings in terms of CPU core frequency for three different CPUs; in our case the Ryzen 5 3400G, Ryzen 5 3200G, and Ryzen 5 3400GE APUs. Disappointingly, it didn't give us the settings for the Ryzen 7 3700X which is installed which would have been useful to know. Perhaps this is something MSI can work on for future versions of the software to automatically detect the CPU installed, and offer information of the profiles based on that.
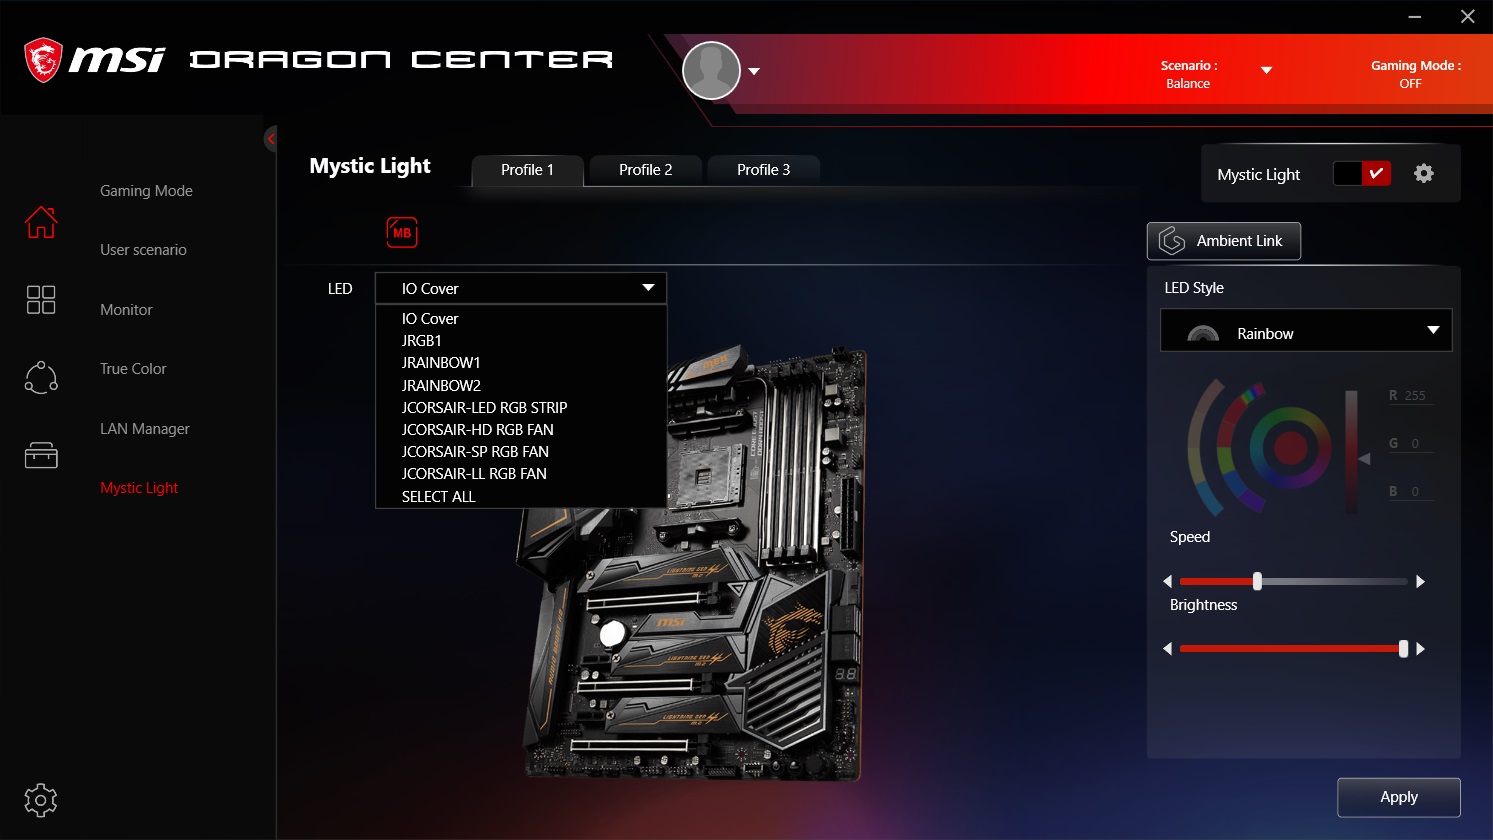
For customizing the various onboard RGB LED capabilities of the MSI MEG X570, MSI has included the Mystic Light RGB utility within the confines of the Dragon Center application. Users can synchronize all of the integrated RGB LEDs with the four different RGB headers and three Corsair RGB fan connectors, or individually customize it to create a mish-mash of RGB lighting. MSI includes an extensive list of lighting profiles ranging from its Rainbow mode, the more commonly seen breathing, flashing, random modes, as well as the Lightning mode and CPU temperature modes; the CPU temperature mode is good for users who want a visual representation of the current temperature of the processor.
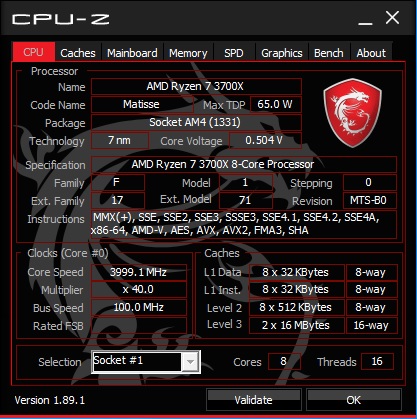
It wouldn't be a complete software suite without the inclusion of a custom skinned CPU-Z monitoring utility, and MSI incorporates its Gaming Dragon theme. The current version at the time of the review is 1.89.1, but MSI should update this with each new build released by its creator, CPUID.
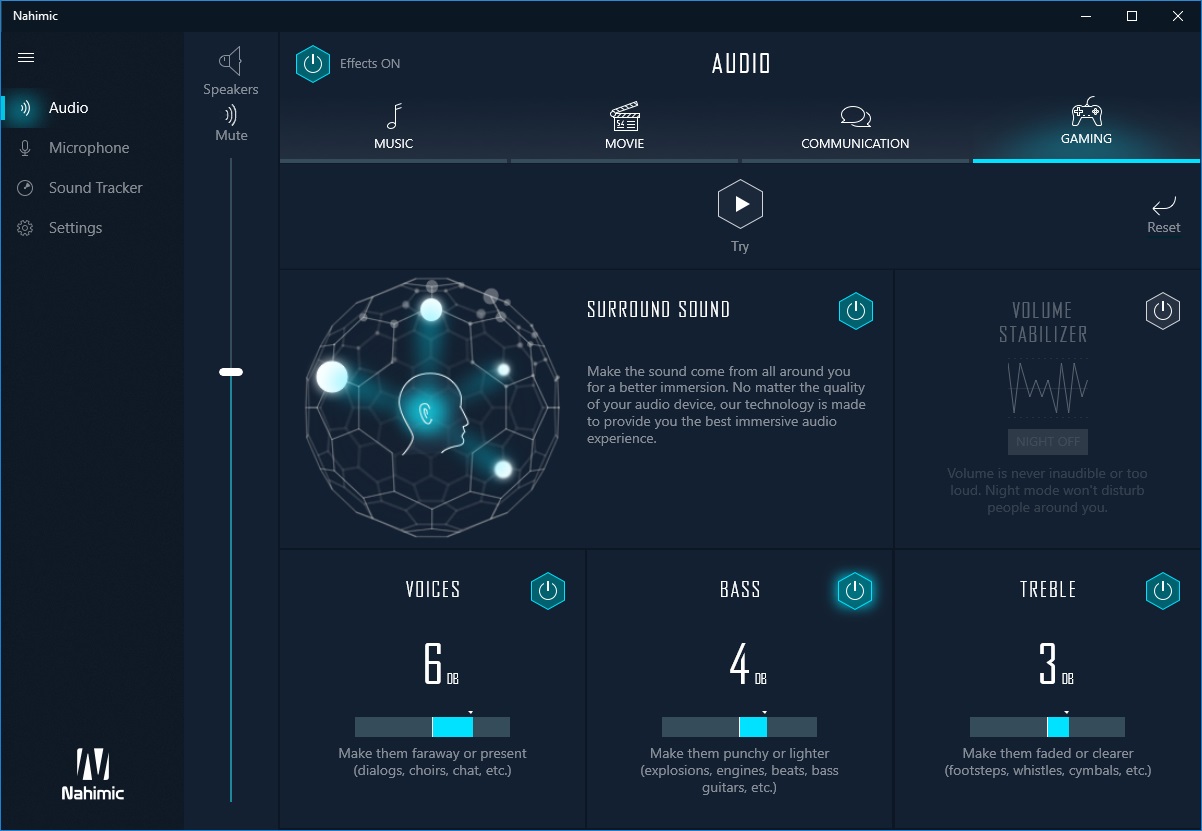
To assist its Realtek ALC1220 HD audio codec, MSI opts for the Nahimic 3 audio software which MSI are in a current partnership with to develop custom audio solutions for its gaming branded motherboards and gaming laptops. Similar to the functions of what Creative offer with its audio solutions, there are customizable options for microphone, audio profiles for music, movie, communication applications and gaming, as well as adjustable bass and treble to fine-tune the auditory experience. The sound tracker is highly useful in games such as FPS titles where a visual representation of where a sound came from such as a gunshot is displayed on the screen.


Users looking for audio software out of the box will, unfortunately, be disappointed. We've suggested this multiple times previously, but it is insisted that users download even the basic Realtek Audio Control Panel and the Nahimic 3 software directly from the Microsoft Store. Aside from this, MSI has made a positive move forward by reducing the number of separate software applications and has rolled it down into one easy to use and intuitive application. Perhaps MSI could incorporate something auditory into the Dragon Center without the need to download sound applications directly from the Microsoft Store.


92 Comments
View All Comments
Irata - Friday, July 19, 2019 - link
Also, the MSI MEG Ace's LGA1151 version is not really much cheaperrocky12345 - Friday, July 19, 2019 - link
I am not sure about this "all at a fairly reasonable price." Since when is $369USD considered a reasonable price for a mid tier board? For us Canadians that translates to $483CAD and then if you factor in the retailers increase it becomes over $500CAD. Great review though thank you.peevee - Friday, July 19, 2019 - link
Exactly. The price is totally unreasonable. It's a price for server MBs.rocky12345 - Friday, July 19, 2019 - link
I made another post on this but since there is no edit function I am posting again on the post times for these new boards. 18-31 seconds before it even starts to boot to Windows ouch that is a long time. My current board form power press to Windows desktop only takes up to about 11-12 seconds and it also has a lot of features to setup after it posts to the screen. I have not been on an AMD platform for a very long time so maybe it is just an AMD thing and they take longer to get everything ready I am not sure. Maybe it is the same with the new Intel stuff as well.By the time these new boards get you to Windows on my current system I would have either had YT open and already playing a video or Netflix logged in and picking a movie or already reading an article from Anandtech site.
pavag - Saturday, July 20, 2019 - link
+1Daveteauk - Thursday, April 9, 2020 - link
Rocky - my ACE posts to DT in 14 seconds, and the OS is loaded. You must have done something wrong in BIOS or your setup.beginner99 - Friday, July 19, 2019 - link
only 4 sata ports on a >$350 board is a no go. It's the only one in this price range with that limit. I currently have 2 ssds, 3hdds and a bluray connected via sata. Admittedly 1 ssd could go, and 1 hdd, bluray probably also but the one time every 2 years you need it...Anyway a asus Strix-e is cheaper and has no obvious downside to this board and 6 sata (or is it 8?). I'm aware some sata ports get disabled if you use multiple m.2 but having either option is clearly a plus.rocky12345 - Friday, July 19, 2019 - link
Yep same 4 ports would not be enough for me as well. Heck even my old z77x board supports up to 9 sata drives granted only 5 of those are Sata 6 the other 4 are only Sata 3 ports.peevee - Friday, July 19, 2019 - link
Nobody in their right mind should use more than 2 SATA devices with a MB like that for Ryzen 3 CPUs. Did you also connect perforated tape readers to your Pentium 4?Your main SSDs should be PCIe 4.0 x4 for this MB to make sense, for example. 1 old BD + maybe, MAYBE some new 8TB+ HDD if you need to store a lot of RAW video. But maybe an external enclosure with RAID would be better, to turn it on only when needed.
pavag - Saturday, July 20, 2019 - link
I have 8 SATA drives connected.